Mostrar mensagens com a etiqueta Lauren Conrad. Mostrar todas as mensagens

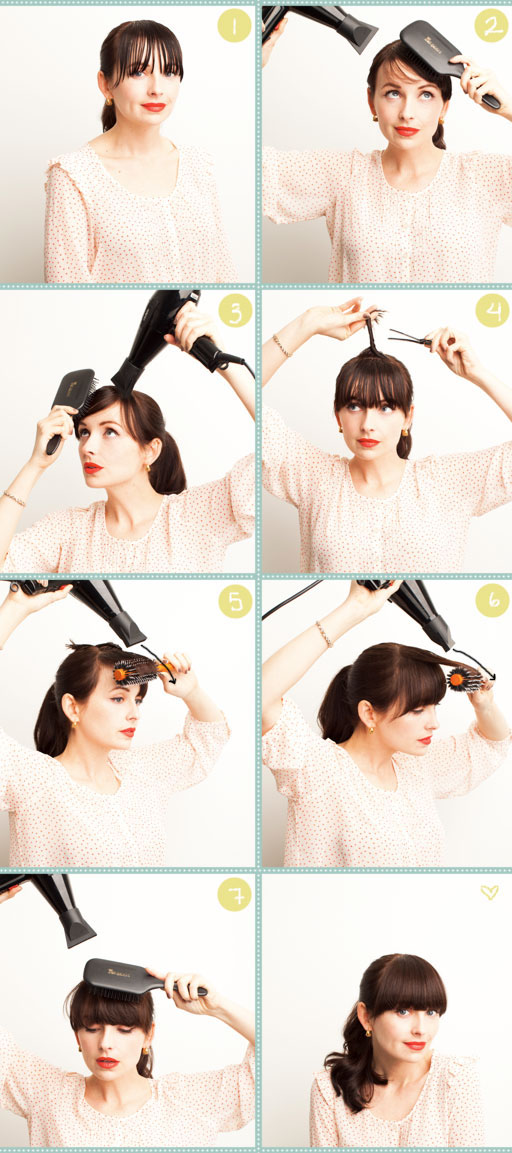
how to master bangs - hair tutorial nº14

>> sábado, 7 de janeiro de 2012

One of the news i've to tell you is that I decided to get bangs in the last days of 2011. I felt like I needed a change in something to enter in 2012 in great style. I love bangs, I really love, but sometimes i've to admit that is very difficult to master them. But Lauren Conrad and her friends posted yesterday a very useful tutorial about who to blow dry heavy bangs. This has the key steps in how to master bangs, and i'm very happy to know that I blow dry my bangs in the right way.


  1. Always blow out your bangs while your hair is super wet. The sooner you blow dry them out of the shower, the better the result will be. Hair is most cooperative and flexible before it air dries. 
  2. Using your blow dryer with the nozzle attached and a paddle brush shift everything all the way to one side. Make sure to get warm air into the root. That will help you manipulate any unwanted “cowlicks”. 
  3. Next, use your paddle brush to shift everything to the opposite side. Make sure you’re giving it a good push in the opposite direction.
  4. Split the bangs in half horizontally and clip the top half up.
  5. Using a medium to large sized round brush smooth the bottom layer of your bangs out. Instead of curling them under, smooth all the way through the ends and point the nozzle toward the tip of the bangs as you see in the photo! Trick: the closer you keep the brush to your forehead and the less curling under you do, the less volume they will have. The more you lift the bangs and the more you curl under, the more volume you will have. 
  6. Repeat the same motions with the top layer. 
  7. Take the paddle brush and shift the bangs from left to right once more to smooth everything out. Spray lightly with hairspray if desired.


facebook, twitter, bloglovin'fashiolista & tumblr

Read more...

Master the French Braid - hair tutorial nº12

>> quinta-feira, 3 de novembro de 2011

E a LC deixou-nos um vídeo maravilhoso para quem ainda não domina completamente as french braids. Ela usa um truque que tenho que experimentar. Embora consiga fazer este tipo de tranças a mim mesma com a maior das facilidades, nem sempre fica perfeita a mecha eu nos "cobre" a cabeça! 


Take a look! :D


TOOLS: 
  • a flat brush or regular brush to detangle 
  • clear elastic ponytail holder 
  • scissors (be careful when cutting out the top elastic. best to have someone else do it for you) 


STEPS:
  1. Start with all of your hair down.
  2. Brush through any tangles.
  3. Gather the top center section.
  4. Tie it with a clear elastic. This makes starting the braid MUCH easier.
  5. Take one section from each side and cross them over the center section.
  6. Add a new piece of hair to each section as you go.
  7. Continue all the way down to the neckline.
  8. Pull the remaining hair around your shoulders and finish with a regular braid.
  9. As for the top elastic– you can either tuck it down into the braid, or carefully cut it out.

Read more...

Arrisquei e ficou assim!, Nails tutorial nº11

>> domingo, 30 de outubro de 2011


Como amanhã é dia das bruxas (ahaha), hoje decidi pintar as unhas de uma forma diferente. Usei o verniz 1 da Andreia (azul) e um Renda da Risqué que tem uns brilhantes. Em baixo fica o tutorial que usei para chegar a esta "obra de arte"! :)

Have F-U-N!! 


STEPS:


1. Start with clean, bare nails that have been filed.

2. Apply 1 to 2 coats of the silver polish (depending on the coverage of the polish). Be sure to paint your whole nail. If the color ends up showing through the navy polish it will just add a little sparkle, but it is important to have a smooth first layer. Let the polish dry for at least 30 minutes. It is important your nails are dry before placing the reinforcement stickers on them or else the stickers will peel off the polish and you will have to start all over again. Oh no!

3. Once nails are completely dry, place a reinforcement sticker on each nail with the outside of the sticker mimicking the shape of the moon of your nail. Cutting a slit in each sticker will allow the stickers lay more evenly on each nail. You can decide what size you would like the moons to be, but it is important that the size stay consistent across all your nails for it to look right. Once they are all placed where you would like them, apply pressure to each making sure they are secure to your nail.

4. Now paint the top half or your nail with 2 coats of navy blue polish. Let this coat dry for at least 10 mins.

5. Once that’s dry, carefully pull the reinforcement stickers off of each nail.

6. Finish with a clear top coat.


Read more...

Fishtail Braid with Lauren Conrad - tutorial nº8

>> domingo, 11 de setembro de 2011


Tools: 2 clear elastics, scissors, patience.
  • For a smoother braid, brush your hair out first. For a messier braid, leave the natural texture and separate the hair with your fingers. 
  • Create a ponytail using a clear elastic. 
  • Split the ponytail into two separate pieces. 
  • Take a piece from the first side and pass it to the 2nd side. 
  • Next take a piece from the 2nd side and pass it back to the 1st side. 
  • Once you’ve finished your braid, go in with your scissors and CAREFULLY cut the clear elastic at the top. 
  • Optional: gently pull on the pieces to loosen it up if you wish!

From the beauty department

Nota: Eu pessoalmente gosto dela mais direitinha e de usar mechas mais pequenas, mas isso depois é ao gosto de cada uma.


Read more...

How can I get catty eyes? - tutorial nº4

>> quarta-feira, 20 de julho de 2011

Adoro este tipo de maquilhagem para os olhos, mas confesso que demoro horas a fazê-lo! No entanto, a Lauren e a Amy Nadine mostram-nos como coisas difíceis podem ser simples. Depois deste tutorial, confesso que demoro muito menos tempo e fica mesmo bonito! Vocês costumam usar? No dia a dia ou só em saídas à noite e jantares especiais? 
Contem-me tudo! :)

----

I love this kind of eye make up, but I confess that it takes me hours to do it! However, Amy Nadine and Lauren show us how difficult things can be simple. After this tutorial, I confess that it takes much less time and is just beautiful! How often do you use it? On a daily basis or only in evenings and special dinners? 
Tell me everything! :)


Tools: You’ll need a black liquid liner, or for the faint of heart, try a gel liner with a thin liner brush.

• Start at the inner corner and drag the brush along the lashline to the outer corner.

Tip: If you rest your elbow on a counter in front of your mirror, if will give you a steadier hand because the only pivot allowed will be at the wrist.

Tip: the firmer you press the brush, the thicker the line will be.

• Then imagine a line from the outside corner to the end of your brow, that becomes the angle for the wing. With light brush strokes, slowly draw the wing at that angle.


facebook, twitter, bloglovin'fashiolista & tumblr


Read more...

Ballerina Bun the LC Signature - tutorial nº3

>> sábado, 16 de julho de 2011


Adoro este penteado. Já experimentei fazer em mim e é muito fácil e fica mesmo muito giro mesmo tendo eu pouco volume no cabelo e ele seja demasiado curto para este tipo de apanhados. É ideal para uma saída à noite ou mesmo uma ida às compras em dias quentes!

 Experimentem!

----

I love this hairstyle. I've tried to make it with my hair and it is very easy and is just really cute even though I've little volume in my hair and it is too short for this kind of bun. It is ideal for a night out or even a shopping trip on hot days! 

Try it!


It’s classic, it’s quick, it can make you look taller, and you can wear it with almost anything! The ballerina bun can be worn high up on the top of your head or down lower near the back of your neck. Either way, our favorite ”go-to-do” for anyone with collar bone length hair or longer.

Tools: 1″ barrell curling iron, clear elastic or pony tail holder, smoothing + updo brush, 4-6 large bobby pins, firm holding hairspray.

1. Using a 1 inch curling iron quickly curl all of your hair under.

2. Flip hair over and gather into a high ponytail securing with an elastic or ponytail holder.

3. Using your smoothing brush, back comb (lightly tease) hair. (This will help the bun look more voluminous!)

4. Twist hair and wrap around the base to create your bun shape.

5. Insert bobby pins along the base of the bun, securing it to your head.

6. Spray all over with a firm holding hairspray and smooth down fly-aways.

TIP: I like to shake my head side to side to make sure it’s really secure before I finish.


facebook, twitter, bloglovin'fashiolistatumblr

Read more...

Musa nº1 - Lauren Conrad

>> sexta-feira, 8 de julho de 2011


Decidi hoje começar esta nova rubrica. Há algumas "celebridades" nas quais me inspiro no me dia a dia. Adoro ver a combinação de cores, peças de roupa e acessórios que elas usam, mas acima de tudo adoro aprender novos penteados, que para mim fazem toda a diferença no visual de uma rapariga/mulher. A Lauren Conrad é sem a menor das dúvidas a minha musa número um. Adoro tudo nela. Acho que é mesmo muito bonita e se seguiram as séries Laguna Beach e depois o spin off The Hills puderam assistir à sua evolução a nível de roupa e a maneira como ela arranja o cabelo e se maquilha para as diferentes situações que nos surgem no dia a dia. O que mais admiro nela é o sorriso e o cabelo. Acho o cabelo lindo, sempre impecável e grande. A verdade é que ela sabe usar muito (mas mesmo muito) bem o BaByliss para fazer aquelas ondas maravilhosas e largas. 

Ela virou escritora e já lançou uma espécie de trilogia que quero ver se leio nas férias de Verão. Já alguma de vocês leu os livros dela? 

A Lauren também vos inspira? :)

facebook, twitter, bloglovin'fashiolistatumblr

Read more...

Frase nº19

>> domingo, 12 de junho de 2011


Read more...

  © Blogger template Simple n' Sweet by Ourblogtemplates.com 2009

Back to TOP