Mostrar mensagens com a etiqueta cabelo. Mostrar todas as mensagens

Master the French Braid - hair tutorial nº12

>> quinta-feira, 3 de novembro de 2011

E a LC deixou-nos um vídeo maravilhoso para quem ainda não domina completamente as french braids. Ela usa um truque que tenho que experimentar. Embora consiga fazer este tipo de tranças a mim mesma com a maior das facilidades, nem sempre fica perfeita a mecha eu nos "cobre" a cabeça! 


Take a look! :D


TOOLS: 
  • a flat brush or regular brush to detangle 
  • clear elastic ponytail holder 
  • scissors (be careful when cutting out the top elastic. best to have someone else do it for you) 


STEPS:
  1. Start with all of your hair down.
  2. Brush through any tangles.
  3. Gather the top center section.
  4. Tie it with a clear elastic. This makes starting the braid MUCH easier.
  5. Take one section from each side and cross them over the center section.
  6. Add a new piece of hair to each section as you go.
  7. Continue all the way down to the neckline.
  8. Pull the remaining hair around your shoulders and finish with a regular braid.
  9. As for the top elastic– you can either tuck it down into the braid, or carefully cut it out.

Read more...

Fishtail Braid with Lauren Conrad - tutorial nº8

>> domingo, 11 de setembro de 2011


Tools: 2 clear elastics, scissors, patience.
  • For a smoother braid, brush your hair out first. For a messier braid, leave the natural texture and separate the hair with your fingers. 
  • Create a ponytail using a clear elastic. 
  • Split the ponytail into two separate pieces. 
  • Take a piece from the first side and pass it to the 2nd side. 
  • Next take a piece from the 2nd side and pass it back to the 1st side. 
  • Once you’ve finished your braid, go in with your scissors and CAREFULLY cut the clear elastic at the top. 
  • Optional: gently pull on the pieces to loosen it up if you wish!

From the beauty department

Nota: Eu pessoalmente gosto dela mais direitinha e de usar mechas mais pequenas, mas isso depois é ao gosto de cada uma.


Read more...

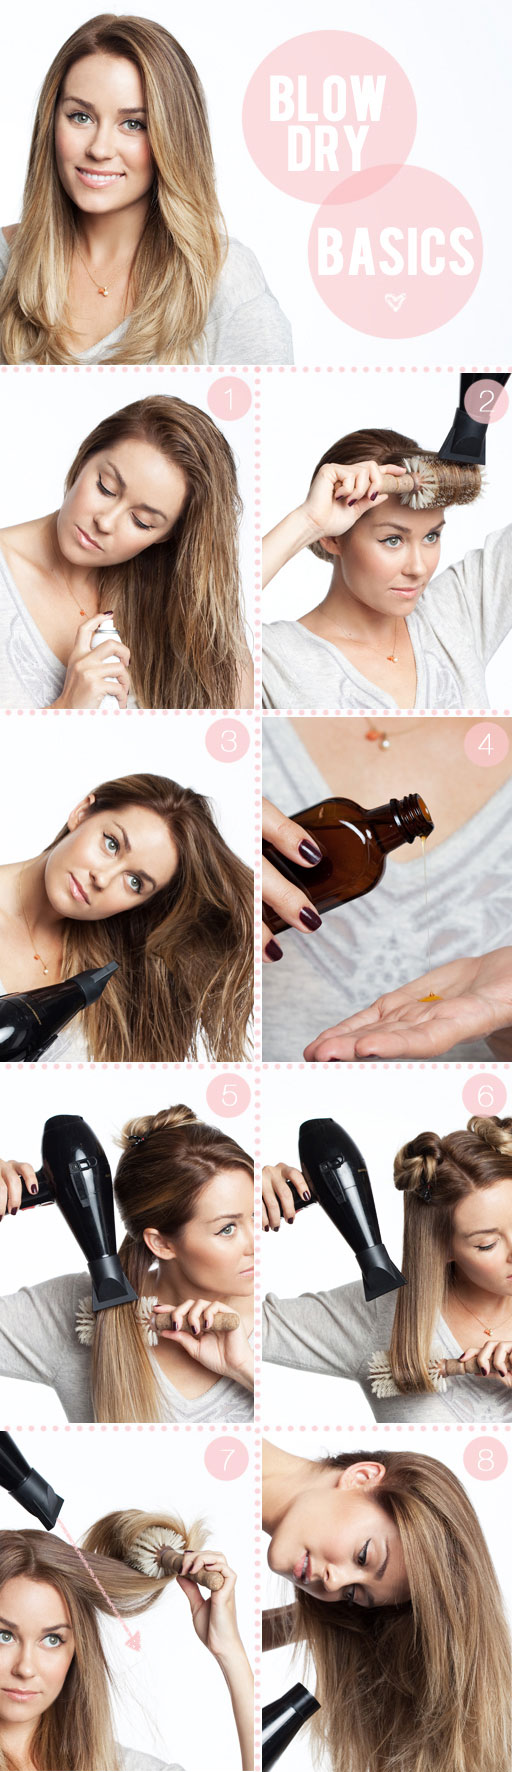
How to blow dry your hair - tutorial nº7

>> quarta-feira, 31 de agosto de 2011

E eis que chegou o tutorial perfeito para quem quer alisar o cabelo sem ter que ir ao cabeleireiro ou recorrer à ajuda de um alisador de cabelo. Eu já há alguns meses (3 ou 4) que deixei de gostar do meu cabelo encaracolado. Não é tanto os caracóis que me incomodam, mas sim o facto de o meu cabelo crescer a passo de caracol. Foi essa a razão eu me levou a alisar o cabelo cada vez que o lavo. Com o auxílio de uma escova e de um bom secador consigo alisá-lo na perfeição em menos de 10 minutos. Não fica tão liso como quando vou ao cabeleireiro, mas eu até gosto mais assim. Fica com um jeitos bonitos que lhe dão um ar muito mais natural.
No entanto, parece que há mais algumas dicas que vou aproveitar, uma vez que o the beauty department nos deixou com um tutorial muito simples com as bases de como secar o cabelo. Eu vou hoje experimentar já que é dia de lavar o cabelo. 

E quanto a séruns... há algum que me recomendem? 
Acho que preciso mesmo de comprar um para não estragar tanto o cabelo com o calor do secador...


Tools: Blow dryer with the nozzle, leave-in conditioner or detangler, protective serum or frizz taming serum, medium to large round brush, clips. 
  1. On wet hair, spray leave-in conditioner or detangler so that you’re not ripping at your hair as you brush it out. Always best to apply leave-in or detangler right out of the shower, before the hair starts to air dry. Spraying it on air dried hair may cause the hair to feel sticky in the long run. 
  2. Like I always say, blow your bangs/fringe section out FIRST. The sooner you blow this out, the more control you’ll have over parting + cowlicks. People always tell me how much difficulty they’ve had with this section, and once they’ve tried blowing it out while it’s totally wet, everything changes. The wetter the better when it comes to the very front section of your hair, or any uncontrollable cowlick for that matter. You want to stretch the hair from left to right while blowing it out. That will give you the most flexibility with your part. Your nozzle should be ON! 
  3. Once you’ve tamed the front section, let the rest down and take a little moisture out, but not too much because it will end up dry in some places and wet in others. Try to keep the dryer moving and do your best to keep the hair evenly damp. 
  4. Now apply a frizz tamer, argan oil, or protective serum. Whatever you and your hairstylist like the most. I like to apply this after I rough dry. The hair needs more protection and smoothing when there’s direct brush + blow dryer contact. If you put it in before this, it may not be as helpful. You don’t need a lot! Just a little applied from the middle of your hair to the ends. 
  5. Next move to the back. Pull the sections around as you dry. Stretching them will help smooth them. Notice Lauren’s using a boar bristle brush. Brushes with lots of natural bristles are great for smoothing because they grab the hair and get lots of tension. Always turn your head to the side when blowing out the back. It’s easier on your arms and you get more access to the root area which is important in the back sections. Work your way up, section by section until you reach the top/back. 
  6. Then you’re on to the sides. Divide the left + right sections and clip them up (see image 6). The most important thing on the sides is getting even tension. Make sure the hair is laying evenly on the brush. Also, since you started in the back, this will have air dried a little. Wet it a little bit if you think it’s getting too wavy. Once the hair starts drying and developing it’s own wave, you need to wet it a little or you’ll just end up with more frizz. Stop for knots! Comb them out nicely or bad things can happen! 
  7. After you’ve blown your hair out entirely, go back through and handle the fly aways! My favorite technique for that is blowing all the little hairs underneath the big hairs. In other words, using your blow dryer with the nozzle attached, push the little hairs underneath the longer heavy hairs. The longer heavy hairs will sit on top of the little hairs and weigh them down! It’s my favorite trick and works so much better than loading the top of your head with hairspray. 
  8. After you’ve gotten dressed and the hair has cooled, the fly aways should be tamed. Now go back in, take off the nozzle, flip your head over and “stir it up”. This gives you a more natural, piece-y look and keeps it from looking too done.

Read more...

Devaneios nº24 - Como domar cabelos volumosos & O problema dos cabelos sem volume take2!

>> terça-feira, 12 de julho de 2011


Bem há uns dia decidi procurar como é que podemos aumentar o volume do nosso cabelo, e a Mimi' disse que gostava de saber como é que poderia "domar" por assim dizer o excesso de volume de cabelo que ela tem. Posto isto decidi informar-me sobre o assunto, para poder mostras às meninas que ao contrário de mim lutam contra o volume de cabelo pequenas dicas que de certeza vos vão ajudar. Só não posso é dizer "já experimentei e resulta!" mas isso fico à espera que quem sofre de excesso de volume no cabelo me dê um feedback sobre se estas dicas ajudam ou não! ;)


1. Hidratação
Segundo aquilo que li, cabelos hidratados por norma não "armam". Portanto, se o vosso cabelo for seco, hidratem-no uma ou duas vezes por semana. Se tiverem cabelos oleosos ou normais façam a hidratação uma vez por mês apenas. Para potencializar o efeito do creme hidratante, champô anti-resíduos, retirem o excesso de água e apliquem o produto da raiz até às pontas, madeixa a madeixa como se o estivessem a alisar. Deixem actuar e depois enxaguem até retirarem todo o creme. 

2. Água Morna
No dia-a-dia lavem o cabelo com água morna e com champô adequado para o vosso cabelo. Se a água estiver quente o cabelo perde a oleosidade e o resultado é um cabelo seco e armado. Não dispensem nunca o condicionador.

3. Leave-in
Façam do leave-in o vosso melhor amigo, sobretudo se tiverem cabelos crespos ou encaracolados. Podem usar creme para pentear, um disciplinador ou um activador de caracóis. Quando aplicarem, inclinem a cabeça para o lado e amassem os caracóis como se estivessem a amassar papel de prata. Deixem depois o cabelo secar naturalmente. Se depois de secos, os cabelos ficarem muito rijos por causa do leave-in amassem-nos novamente com as mãos. Se os vossos cabelos forem lisos, nos dispensem o uso de um reparador de pontas ou cera. Mas não exagerem na quantidade. O reparador de pontas também pode ser usado nos cabelos encaracolados.

4. Para Dormir
Ao deitar façam um poupo com o cabelo torcido. Na manhã seguinte, os cabelos estarão domados e levemente ondulados. Nunca se deitem com o cabelo molhado ou ainda húmido.

5. Acessórios
Tenham sempre com vocês alguns acessórios para prender as madeixas. Não se esqueçam de colocar nas vossas carteiras elásticos e bobby pins. Podem ser a vossa salvação em qualquer momento do dia. O rabo-de-cavalo, poupos e tranças, além de serem super práticos (principalmente no agora no Verão) deixam qualquer mulher com um visual moderno, citadino e muito feminino.


6. Como cortar?
Bem, a verdade é que o corte certo faz milagres. Discutam com o vosso cabeleireiro as melhores opções para o vosso tipo de cabelo. Quem tem o cabelo encaracolado por exemplo deve fugir aos cortes rectos que deixam o look pesado e volumoso na parte inferior.

7. Cabelos Curtinhos
Se tiverem o cabelo curto é muito mais fácil domar o volume. Basta um pouco de mousse ou spray e é tudo. No entanto não dispensem a hidratação.

8. Pentes
Escovas em almofada e pentes finos estão proibidos. Se tiverem cabelo crespo, encaracolado ou ondulado prefiram pentes de dentes largos que desembaraçam e deixam o cabelo no lugar sem que este arme. Devem pentear os cabelos ainda húmidos e usar um leave-in logo de seguida com o truque de amassar os cabelos. Se tiverem cabelo liso usem escovas redondas e um produto finalizador.


_____________________________________________________________

Agora uma pequena nota para os cabelos sem volume. Não se viram, mas entretanto o the beauty department lançou um pequeno tutorial de como aumentar o volume para cabelos que têm falta dele! Fica aqui a dica e depois digam-se se resulta! :)


This is for those of you who have super flat hair. Whether it’s fine or thick, follow our gorgeous Jamie Chung through the simple steps of achieving the perfect amount of volume!

Tools: volumizer (talk to your hairstylist + ask what they recommend for your hair type!), blow dryer, rubber band, medium velcro rollers, 1″ curling iron, setting clips or big bobby pins, teasing comb or teasing brush, light to medium hold hairspray.

1: Add a non-sticky volumizer to your root. Blow dry hair upside down.

2: Put all of your hair up in a quick bun (doesn’t matter what it looks like). This is the time to do your makeup because it will give the hair time to cool while directed upward which creates MAXIMUM volume.

3: Once hair has cooled, take it down and roll the center section in velcro rollers. I recommend rolling them backwards.

4: Using your 1″ curling iron, curl the remainder of your hair “up and back” as you see Jamie doing in #4.

5: Continue curling pieces all the way around and setting them in silver setting clips or with large bobby pins.

6: Allow the hair to set for about 5 more minutes before taking everything down. This is a good time to get dressed while the hair is up and out of your way!

7: Take everything down out of the clips. Slowly pull out the velcro rollers. I like to brush the hair lightly to bring out the fullness of the curl.

8. Curl the top pieces from the velcro rollers just the same as the rest to blend. Curl “up and back” by wrapping the hair on the outside of the iron.

9: Tease the crown a little. This will add volume and break up the curl a little bit. (If you don’t want your curl broken up as much, you can tease the hair before one step earlier before doing #8)

10: Mist with a light veil of hairspray and enjoy!

facebook, twitter, bloglovin', fashiolista & tumblr

Read more...

Devaneios nº23 - O problema dos cabelos sem volume!

>> sexta-feira, 8 de julho de 2011

from http://valeriaortiz.tumblr.com/
Vamos lá então falar de cabelos sem volume. Eu antes de ir para a faculdade tinha um cabelo muito bonito, grande, saudável e com o volume adequado, onde qualquer penteado ficava bem. Alguns meses depois, o meu cabelo começou a cair, e embora tenha feito muitos tratamentos, a queda foi permanente durante cerca de 2 anos. Nada o fazia parar de cair. Agora o meu cabelo é cerca de metade do que era e tem mesmo pouco volume. Penso que este problema deve afectar muitas das minhas leitoras, que sonham ter um cabelo de sonho. Por isso vou-vos deixar com algumas dicas que podem aumentar o volume do vosso cabelo:
  • Os cortes que retirem peso, como os escadeados e os médios-curtos são os mais recomendados para este tipo de cabelos, uma vez que fazem com que ganhe maior forma e estrutura.
  • Recomenda-se o uso de champôs, loções e espumas de textura leve para a obtenção de mais corpo.
  • O secador também é um aliado, quando utilizado a baixa temperatura e afastado da cabeça.
  • Madeixas ou uma coloração parcial ou total podem ajudar a criar mais volume, assim como uma ondulação leve.

Ora bem, o meu melhor aliado neste momento é mesmo o secador. Já uso o frio há algum tempo para lhe dar corpo e volume, e acreditem que resulta!

Read more...

  © Blogger template Simple n' Sweet by Ourblogtemplates.com 2009

Back to TOP