Mostrar mensagens com a etiqueta tutorial. Mostrar todas as mensagens

how to master bangs - hair tutorial nº14

>> sábado, 7 de janeiro de 2012

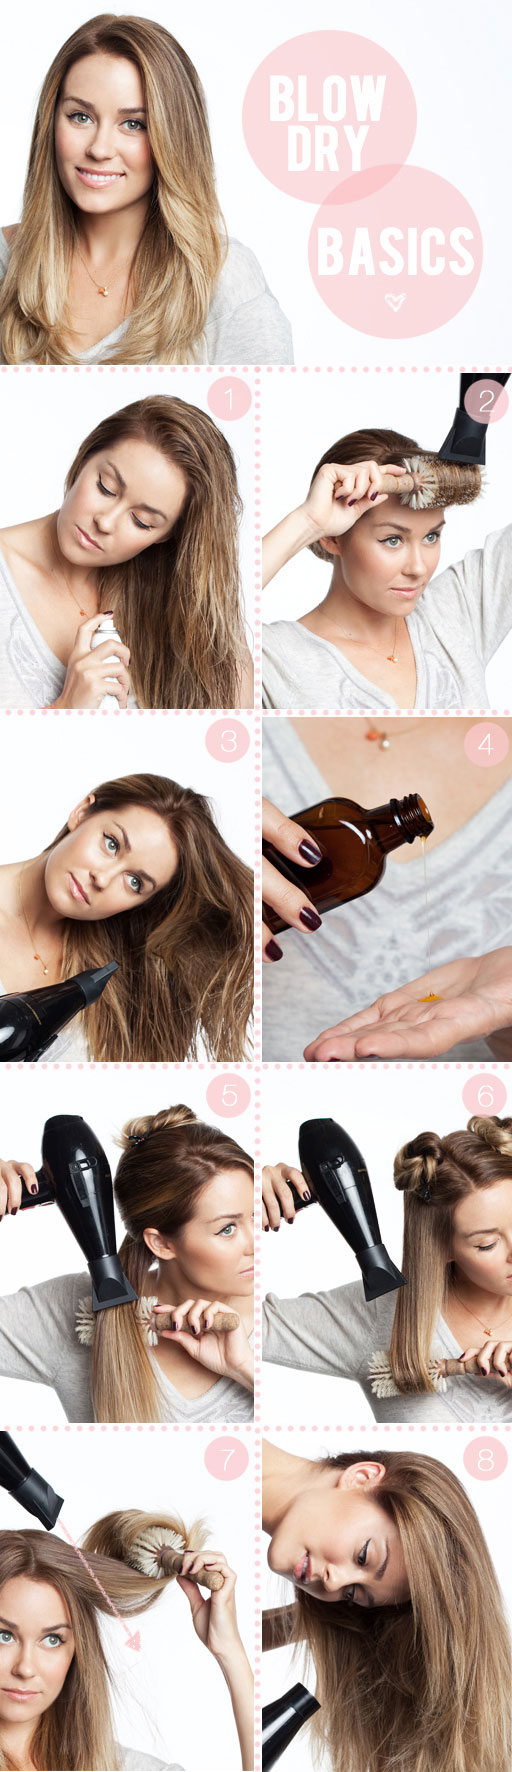
One of the news i've to tell you is that I decided to get bangs in the last days of 2011. I felt like I needed a change in something to enter in 2012 in great style. I love bangs, I really love, but sometimes i've to admit that is very difficult to master them. But Lauren Conrad and her friends posted yesterday a very useful tutorial about who to blow dry heavy bangs. This has the key steps in how to master bangs, and i'm very happy to know that I blow dry my bangs in the right way.


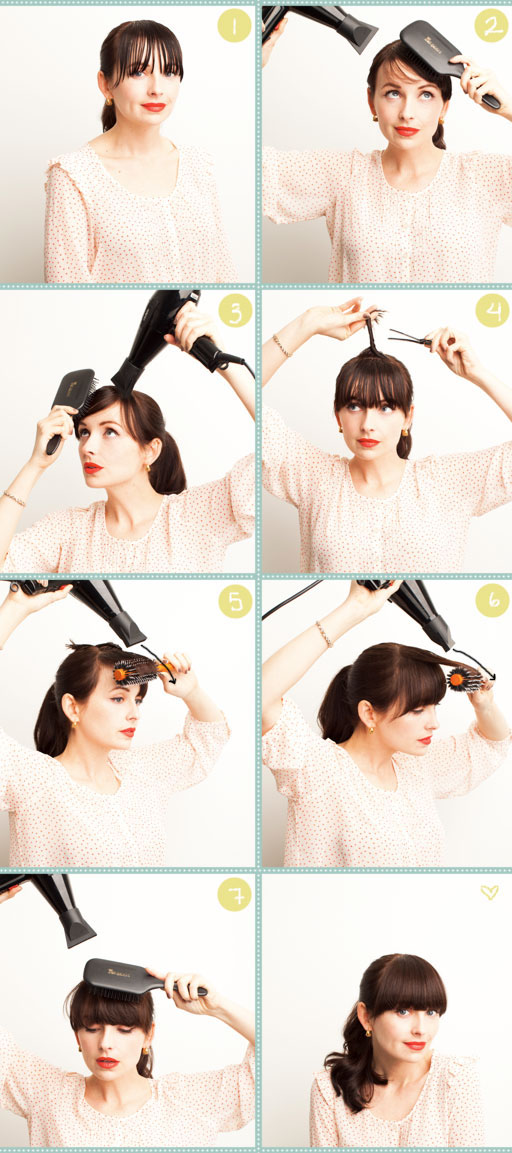
  1. Always blow out your bangs while your hair is super wet. The sooner you blow dry them out of the shower, the better the result will be. Hair is most cooperative and flexible before it air dries. 
  2. Using your blow dryer with the nozzle attached and a paddle brush shift everything all the way to one side. Make sure to get warm air into the root. That will help you manipulate any unwanted “cowlicks”. 
  3. Next, use your paddle brush to shift everything to the opposite side. Make sure you’re giving it a good push in the opposite direction.
  4. Split the bangs in half horizontally and clip the top half up.
  5. Using a medium to large sized round brush smooth the bottom layer of your bangs out. Instead of curling them under, smooth all the way through the ends and point the nozzle toward the tip of the bangs as you see in the photo! Trick: the closer you keep the brush to your forehead and the less curling under you do, the less volume they will have. The more you lift the bangs and the more you curl under, the more volume you will have. 
  6. Repeat the same motions with the top layer. 
  7. Take the paddle brush and shift the bangs from left to right once more to smooth everything out. Spray lightly with hairspray if desired.


facebook, twitter, bloglovin'fashiolista & tumblr

Read more...

a real ballerina bun - tutorial nº13

>> segunda-feira, 5 de dezembro de 2011

Rita's ballerina bun by Marta Araújo

I've seen a video tutorial about how to do a ballerina bun advised in the blog Confessions of a Shopaholic. I haven't shared it with you before because I wanted to try it first to show you the result and you can see it in the picture. I love this hairdo and it's very easy to do. You can check the video tutorial here although it is in portuguese, but I think you can easily understand the instructions.

facebook, twitter, bloglovin'fashiolista & tumblr

Read more...

Master the French Braid - hair tutorial nº12

>> quinta-feira, 3 de novembro de 2011

E a LC deixou-nos um vídeo maravilhoso para quem ainda não domina completamente as french braids. Ela usa um truque que tenho que experimentar. Embora consiga fazer este tipo de tranças a mim mesma com a maior das facilidades, nem sempre fica perfeita a mecha eu nos "cobre" a cabeça! 


Take a look! :D


TOOLS: 
  • a flat brush or regular brush to detangle 
  • clear elastic ponytail holder 
  • scissors (be careful when cutting out the top elastic. best to have someone else do it for you) 


STEPS:
  1. Start with all of your hair down.
  2. Brush through any tangles.
  3. Gather the top center section.
  4. Tie it with a clear elastic. This makes starting the braid MUCH easier.
  5. Take one section from each side and cross them over the center section.
  6. Add a new piece of hair to each section as you go.
  7. Continue all the way down to the neckline.
  8. Pull the remaining hair around your shoulders and finish with a regular braid.
  9. As for the top elastic– you can either tuck it down into the braid, or carefully cut it out.

Read more...

Arrisquei e ficou assim!, Nails tutorial nº11

>> domingo, 30 de outubro de 2011


Como amanhã é dia das bruxas (ahaha), hoje decidi pintar as unhas de uma forma diferente. Usei o verniz 1 da Andreia (azul) e um Renda da Risqué que tem uns brilhantes. Em baixo fica o tutorial que usei para chegar a esta "obra de arte"! :)

Have F-U-N!! 


STEPS:


1. Start with clean, bare nails that have been filed.

2. Apply 1 to 2 coats of the silver polish (depending on the coverage of the polish). Be sure to paint your whole nail. If the color ends up showing through the navy polish it will just add a little sparkle, but it is important to have a smooth first layer. Let the polish dry for at least 30 minutes. It is important your nails are dry before placing the reinforcement stickers on them or else the stickers will peel off the polish and you will have to start all over again. Oh no!

3. Once nails are completely dry, place a reinforcement sticker on each nail with the outside of the sticker mimicking the shape of the moon of your nail. Cutting a slit in each sticker will allow the stickers lay more evenly on each nail. You can decide what size you would like the moons to be, but it is important that the size stay consistent across all your nails for it to look right. Once they are all placed where you would like them, apply pressure to each making sure they are secure to your nail.

4. Now paint the top half or your nail with 2 coats of navy blue polish. Let this coat dry for at least 10 mins.

5. Once that’s dry, carefully pull the reinforcement stickers off of each nail.

6. Finish with a clear top coat.


Read more...

25 Ways to Wear a Scarf - tutorial nº10

>> sexta-feira, 30 de setembro de 2011

Este post tem um toque especial porque surgiu "graças" à minha mãe. Quem me conhece sabe que eu adoro lenços. Uso-os durante todo o ano, mesmo no verão quando está calor. Não consigo explicar porquê, mas sinto-me um bocadinho despida sem um lenço. Ontem a minha mãe encontrou este vídeo e claro que mo mostrou logo. É a minha "cara". O vídeo perfeito para mim! Neste vídeo a Wendy mostra-nos de uma forma muito rápida 25 maneiras simples e giras de usar lenços e cachecóis. Vão achas o vídeo muito rápido, mas depois no final podem carregar na mini-imagem que mais gostaram que vos encaminha para um outro vídeo onde a Wendy explica com mais pormenor.

Espero que gostem! ;D


Read more...

Nice&Easy Short Hair tutorial nº9

>> terça-feira, 27 de setembro de 2011

Vi este tutorial ontem e fiquei com imensa vontade de experimentar. Parece ser realmente simples e muito bonito para quem como eu não tem o cabelo muito comprido. Além disso acho que  um penteado bastante versátil que dependendo do tipo de tiara usada pode ser informal, formal, divertido, romântico, etc! Experimentem também! ;D


TOOLS: elastic based headband, medium sized curling iron, light-hold styling cream, bobbypins, comb, hand mirror.

  • Start with an elastic based headband. (Learn how to make your own headband HERE!) Curl the ends using a medium curling iron. (1″ or 1 1/4″ barrell is perfect. Giving the hair a little bend keeps the straight ends from popping out.)
  • Apply a small amount of product at the ends. (Ask your stylist for a light-hold styling cream. You just need something with a little hold to help keep things in place.)
  • Put the headband 1-2 inches behind the hairline and pin it to secure. Take small pieces and twist them back + up. Tuck them into the headband and secure with a bobbypin if necessary. (Continue all the way around to the back. Lightly tease pieces with a comb if you have finer hair.)
  • Finish the back and use a hand mirror to check your balance. (Do a light round with hairspray if you need it!)

Read more...

Fishtail Braid with Lauren Conrad - tutorial nº8

>> domingo, 11 de setembro de 2011


Tools: 2 clear elastics, scissors, patience.
  • For a smoother braid, brush your hair out first. For a messier braid, leave the natural texture and separate the hair with your fingers. 
  • Create a ponytail using a clear elastic. 
  • Split the ponytail into two separate pieces. 
  • Take a piece from the first side and pass it to the 2nd side. 
  • Next take a piece from the 2nd side and pass it back to the 1st side. 
  • Once you’ve finished your braid, go in with your scissors and CAREFULLY cut the clear elastic at the top. 
  • Optional: gently pull on the pieces to loosen it up if you wish!

From the beauty department

Nota: Eu pessoalmente gosto dela mais direitinha e de usar mechas mais pequenas, mas isso depois é ao gosto de cada uma.


Read more...

How to blow dry your hair - tutorial nº7

>> quarta-feira, 31 de agosto de 2011

E eis que chegou o tutorial perfeito para quem quer alisar o cabelo sem ter que ir ao cabeleireiro ou recorrer à ajuda de um alisador de cabelo. Eu já há alguns meses (3 ou 4) que deixei de gostar do meu cabelo encaracolado. Não é tanto os caracóis que me incomodam, mas sim o facto de o meu cabelo crescer a passo de caracol. Foi essa a razão eu me levou a alisar o cabelo cada vez que o lavo. Com o auxílio de uma escova e de um bom secador consigo alisá-lo na perfeição em menos de 10 minutos. Não fica tão liso como quando vou ao cabeleireiro, mas eu até gosto mais assim. Fica com um jeitos bonitos que lhe dão um ar muito mais natural.
No entanto, parece que há mais algumas dicas que vou aproveitar, uma vez que o the beauty department nos deixou com um tutorial muito simples com as bases de como secar o cabelo. Eu vou hoje experimentar já que é dia de lavar o cabelo. 

E quanto a séruns... há algum que me recomendem? 
Acho que preciso mesmo de comprar um para não estragar tanto o cabelo com o calor do secador...


Tools: Blow dryer with the nozzle, leave-in conditioner or detangler, protective serum or frizz taming serum, medium to large round brush, clips. 
  1. On wet hair, spray leave-in conditioner or detangler so that you’re not ripping at your hair as you brush it out. Always best to apply leave-in or detangler right out of the shower, before the hair starts to air dry. Spraying it on air dried hair may cause the hair to feel sticky in the long run. 
  2. Like I always say, blow your bangs/fringe section out FIRST. The sooner you blow this out, the more control you’ll have over parting + cowlicks. People always tell me how much difficulty they’ve had with this section, and once they’ve tried blowing it out while it’s totally wet, everything changes. The wetter the better when it comes to the very front section of your hair, or any uncontrollable cowlick for that matter. You want to stretch the hair from left to right while blowing it out. That will give you the most flexibility with your part. Your nozzle should be ON! 
  3. Once you’ve tamed the front section, let the rest down and take a little moisture out, but not too much because it will end up dry in some places and wet in others. Try to keep the dryer moving and do your best to keep the hair evenly damp. 
  4. Now apply a frizz tamer, argan oil, or protective serum. Whatever you and your hairstylist like the most. I like to apply this after I rough dry. The hair needs more protection and smoothing when there’s direct brush + blow dryer contact. If you put it in before this, it may not be as helpful. You don’t need a lot! Just a little applied from the middle of your hair to the ends. 
  5. Next move to the back. Pull the sections around as you dry. Stretching them will help smooth them. Notice Lauren’s using a boar bristle brush. Brushes with lots of natural bristles are great for smoothing because they grab the hair and get lots of tension. Always turn your head to the side when blowing out the back. It’s easier on your arms and you get more access to the root area which is important in the back sections. Work your way up, section by section until you reach the top/back. 
  6. Then you’re on to the sides. Divide the left + right sections and clip them up (see image 6). The most important thing on the sides is getting even tension. Make sure the hair is laying evenly on the brush. Also, since you started in the back, this will have air dried a little. Wet it a little bit if you think it’s getting too wavy. Once the hair starts drying and developing it’s own wave, you need to wet it a little or you’ll just end up with more frizz. Stop for knots! Comb them out nicely or bad things can happen! 
  7. After you’ve blown your hair out entirely, go back through and handle the fly aways! My favorite technique for that is blowing all the little hairs underneath the big hairs. In other words, using your blow dryer with the nozzle attached, push the little hairs underneath the longer heavy hairs. The longer heavy hairs will sit on top of the little hairs and weigh them down! It’s my favorite trick and works so much better than loading the top of your head with hairspray. 
  8. After you’ve gotten dressed and the hair has cooled, the fly aways should be tamed. Now go back in, take off the nozzle, flip your head over and “stir it up”. This gives you a more natural, piece-y look and keeps it from looking too done.

Read more...

Hair Tutorial nº6

>> terça-feira, 23 de agosto de 2011

Como já devem ter reparado eu gosto muito de hair tutorials, especialmente aqueles que envolvem tranças. Isto deve-se ao facto de eu me ter cansado de andar sempre com o cabelo solto ou apenas com um ou dois ganchos pretos a apanhar a franja. 
Para ver se não me volto a cansar do meu cabelo, tento usar um penteado diferente todos os dias. Os requisitos são: tem que ser simples, rápido e bonito. Hoje de manhã acordei sem qualquer tipo de inspiração e voltei a apanhar a franja para trás com os ditos ganchos pretos... Mas, quando abro o the beauty department eis que me deparo com um novo apanhado que preenche os requisitos. Pela primeira vez, deixo-vos uma foto minha com o penteado para verem como fica bonito e em baixo segue como sempre o tutorial!

Por Rita Carvalho Ago'11


It works on literally any hair type – short, long, curly, pin straight, anything! It’s so great for those mornings when you’re in a rush but need something to pull your look together. Think of it as a french braid, but you only add in new hair from one side (the top). Follow these steps + be patient! You’ll get it… 
  • We like to part slightly off-center for this. On the heavier side, grab a section at your hairline. split it in three. 
  • Start it just like you would a regular french braid. 
  • Next add in a piece of hair from the top, still like a regular french braid. 
  • Now skip the part where you’d grab a new piece from the bottom + keep braiding instead. 
  • Then take another piece from the top + add it in. 
  • Continue with this pattern until you have 5-7 sections added in. 
  • Once you’re just past the ear, stop adding in new hair. Just do a regular braid + tie it off with a clear elastic like Lauren’s in the top picture.


facebook, twitter, bloglovin'fashiolistatumblr

Read more...

Crown of Flowers Inspiration nº18, Crown of Flowers tutorial nº5

>> segunda-feira, 8 de agosto de 2011


Parece que finalmente chegou o calor do nosso ameno Verão! É tempo de ir para a praia retocar ou melhorar o bronzeado ou então de ir até ao campo desfrutar das sombras que as copas das árvores nos proporcionam. Se forem até ao campo divirtam-se a fazer coroas de flores para vocês mesmas e para as meninas mais jovens da vossa família como primas, sobrinhas, afilhadas e filhas se for o caso. Vão ver que é uma óptima forma de se divertirem e de deixarem as crianças ocupadas! 

Tenham uma boa semana de férias ou de trabalho! ;)

(em baixo podem encontrar um tutorial simples de como fazer uma coroa de flores)


--♥--

It seems that finally got the heat of our warm summer! It's time to go to the beach retouch or improve your tan or go to the countryside to enjoy the shade that trees provide. If you go to the countryside, have fun making crowns of flowers for yourselves and for the younger girls of your family as cousins, nieces, godchildren and children. You'll see that it's a great way to have fun and let the kids busy! 

Have a good week of holiday or work! ;)


(below you can find a simple tutorial on how to make a crown of flowers)


  • Start with a pair of scissors, a needle + thread, and small flowers. (I got ones that had stronger stems to use for the base, then I’ll add the more delicate ones later)
  • [poke] carefully pierce a hole in the stem of the first flower.
  • [thread through] gently feed the second flower through the pierced hole.
  • [tie] secure the two flowers together by wrapping them with thread right where the two stems meet.
  • [again] do the exact same on the next stem.
  • [and again] feed the next flower through and wrap it with thread as well.
  • do that again and again and again until you have a chain!
  • [twist] use wire to add the more delicate flowers. the stems may be to thin to pierce and thread through. i use bead wire because it’s so thin, but you can also use floral wire. you can get bead wire at the craft store and floral wire at the flower markets.
  • [wear] i added ribbon to the back so it can be tied loosely, but you can also bobby pin it into your ‘do. this is a pretty sturdy way of doing a flower crown so you’re more than welcome to run through fields, forests and do all the cartwheels you want.


facebook, twitter, bloglovin'fashiolistatumblr

Read more...

How can I get catty eyes? - tutorial nº4

>> quarta-feira, 20 de julho de 2011

Adoro este tipo de maquilhagem para os olhos, mas confesso que demoro horas a fazê-lo! No entanto, a Lauren e a Amy Nadine mostram-nos como coisas difíceis podem ser simples. Depois deste tutorial, confesso que demoro muito menos tempo e fica mesmo bonito! Vocês costumam usar? No dia a dia ou só em saídas à noite e jantares especiais? 
Contem-me tudo! :)

----

I love this kind of eye make up, but I confess that it takes me hours to do it! However, Amy Nadine and Lauren show us how difficult things can be simple. After this tutorial, I confess that it takes much less time and is just beautiful! How often do you use it? On a daily basis or only in evenings and special dinners? 
Tell me everything! :)


Tools: You’ll need a black liquid liner, or for the faint of heart, try a gel liner with a thin liner brush.

• Start at the inner corner and drag the brush along the lashline to the outer corner.

Tip: If you rest your elbow on a counter in front of your mirror, if will give you a steadier hand because the only pivot allowed will be at the wrist.

Tip: the firmer you press the brush, the thicker the line will be.

• Then imagine a line from the outside corner to the end of your brow, that becomes the angle for the wing. With light brush strokes, slowly draw the wing at that angle.


facebook, twitter, bloglovin'fashiolista & tumblr


Read more...

Ballerina Bun the LC Signature - tutorial nº3

>> sábado, 16 de julho de 2011


Adoro este penteado. Já experimentei fazer em mim e é muito fácil e fica mesmo muito giro mesmo tendo eu pouco volume no cabelo e ele seja demasiado curto para este tipo de apanhados. É ideal para uma saída à noite ou mesmo uma ida às compras em dias quentes!

 Experimentem!

----

I love this hairstyle. I've tried to make it with my hair and it is very easy and is just really cute even though I've little volume in my hair and it is too short for this kind of bun. It is ideal for a night out or even a shopping trip on hot days! 

Try it!


It’s classic, it’s quick, it can make you look taller, and you can wear it with almost anything! The ballerina bun can be worn high up on the top of your head or down lower near the back of your neck. Either way, our favorite ”go-to-do” for anyone with collar bone length hair or longer.

Tools: 1″ barrell curling iron, clear elastic or pony tail holder, smoothing + updo brush, 4-6 large bobby pins, firm holding hairspray.

1. Using a 1 inch curling iron quickly curl all of your hair under.

2. Flip hair over and gather into a high ponytail securing with an elastic or ponytail holder.

3. Using your smoothing brush, back comb (lightly tease) hair. (This will help the bun look more voluminous!)

4. Twist hair and wrap around the base to create your bun shape.

5. Insert bobby pins along the base of the bun, securing it to your head.

6. Spray all over with a firm holding hairspray and smooth down fly-aways.

TIP: I like to shake my head side to side to make sure it’s really secure before I finish.


facebook, twitter, bloglovin'fashiolistatumblr

Read more...

A simple way to use your hair - tutorial nº2

>> sábado, 2 de julho de 2011


Tools: light holding styling mousse, comb, small clear elastic and a large bobbypin.

Instructions:

1. Apply a light holding styling mousse all over from roots to ends for texture and seperation. Hair can be damp or dry. (If it’s dry, be sure it’s a light holding mousse or you could end up with a strong holding mess.)

2. Separate the hair over your shoulder into two pieces. The piece from the back should come forward and down (see photo).

3/4.  Using your girl scout skills, tie hair into a simple knot.

5. Secure the two ends together using a clear elastic. Once it’s in there, slide it up underneath the knot to conceal it.

6.  I like to throw a bobby pin in there for extra security.

7.  Back comb the ponytail a little for texture and then comb through it with your fingers to settle it.

Tip: Once the steps are complete, tug on it and mess it up a bit. This look is better when it’s a little disheveled!


facebook, twitter, bloglovin'fashiolistatumblr

Read more...

Old Hollywood Glam - Make Up tutorial by Lauren Conrad nº1

>> segunda-feira, 6 de junho de 2011


OLD HOLLYWOOD GLAM

Here’s a simple way to get a vintage inspired look. Eventually we’ll be going into more advanced looks, but some of you may have never tried this look before and we don’t want to scare you off! Pair this video with the “Hint of Vintage” photo tutorial for the ultimate loveliness!

Tools: Foundation, foundation brush or sponge, translucent powder or light-weight powder, blush brush, bronzer, black liquid liner, black mascara, red lipstick

• Start by applying an even layer of foundation to your face being sure to cover any redness, blemishes or dark circles.

• Lightly dust your face with powder for a velvety finish.

• Comb through your brows and fill them in using a brown pencil one shade darker than your natural color.

• Sweep bronzing powder starting directly under your cheekbones, across your hair line and under your jaw line.

• Now apply black liquid liner to your lids and extend the line beyond the corner of your eye for added drama.

• Next apply two coats of black mascara.

• To complete the look, apply red lipstick.

The beauty department.
______________________________________________________________________________________

O que é que vocês acharam deste tutorial? Eu adorei o vídeo, acho que para quem ainda é amador nesta matéria é uma grande ajuda. Eu ainda não experimentei, mas como amanhã é o dia do meu aniversário acho que este look é uma boa opção. 

É tão giro! :)

Read more...

  © Blogger template Simple n' Sweet by Ourblogtemplates.com 2009

Back to TOP