
How to blow dry your hair - tutorial nº7
>> quarta-feira, 31 de agosto de 2011
E eis que chegou o tutorial perfeito para quem quer alisar o cabelo sem ter que ir ao cabeleireiro ou recorrer à ajuda de um alisador de cabelo. Eu já há alguns meses (3 ou 4) que deixei de gostar do meu cabelo encaracolado. Não é tanto os caracóis que me incomodam, mas sim o facto de o meu cabelo crescer a passo de caracol. Foi essa a razão eu me levou a alisar o cabelo cada vez que o lavo. Com o auxílio de uma escova e de um bom secador consigo alisá-lo na perfeição em menos de 10 minutos. Não fica tão liso como quando vou ao cabeleireiro, mas eu até gosto mais assim. Fica com um jeitos bonitos que lhe dão um ar muito mais natural.
No entanto, parece que há mais algumas dicas que vou aproveitar, uma vez que o the beauty department nos deixou com um tutorial muito simples com as bases de como secar o cabelo. Eu vou hoje experimentar já que é dia de lavar o cabelo.
E quanto a séruns... há algum que me recomendem?
Acho que preciso mesmo de comprar um para não estragar tanto o cabelo com o calor do secador...
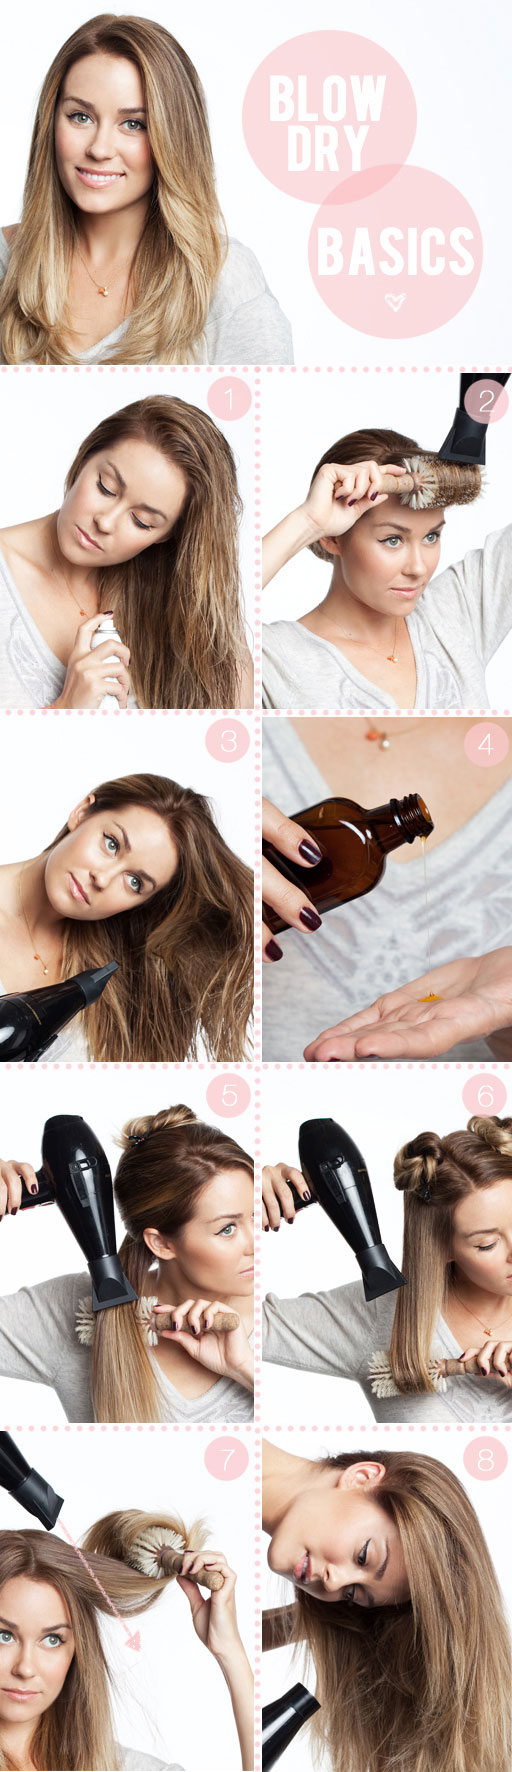
Tools: Blow dryer with the nozzle, leave-in conditioner or detangler, protective serum or frizz taming serum, medium to large round brush, clips.
- On wet hair, spray leave-in conditioner or detangler so that you’re not ripping at your hair as you brush it out. Always best to apply leave-in or detangler right out of the shower, before the hair starts to air dry. Spraying it on air dried hair may cause the hair to feel sticky in the long run.
- Like I always say, blow your bangs/fringe section out FIRST. The sooner you blow this out, the more control you’ll have over parting + cowlicks. People always tell me how much difficulty they’ve had with this section, and once they’ve tried blowing it out while it’s totally wet, everything changes. The wetter the better when it comes to the very front section of your hair, or any uncontrollable cowlick for that matter. You want to stretch the hair from left to right while blowing it out. That will give you the most flexibility with your part. Your nozzle should be ON!
- Once you’ve tamed the front section, let the rest down and take a little moisture out, but not too much because it will end up dry in some places and wet in others. Try to keep the dryer moving and do your best to keep the hair evenly damp.
- Now apply a frizz tamer, argan oil, or protective serum. Whatever you and your hairstylist like the most. I like to apply this after I rough dry. The hair needs more protection and smoothing when there’s direct brush + blow dryer contact. If you put it in before this, it may not be as helpful. You don’t need a lot! Just a little applied from the middle of your hair to the ends.
- Next move to the back. Pull the sections around as you dry. Stretching them will help smooth them. Notice Lauren’s using a boar bristle brush. Brushes with lots of natural bristles are great for smoothing because they grab the hair and get lots of tension. Always turn your head to the side when blowing out the back. It’s easier on your arms and you get more access to the root area which is important in the back sections. Work your way up, section by section until you reach the top/back.
- Then you’re on to the sides. Divide the left + right sections and clip them up (see image 6). The most important thing on the sides is getting even tension. Make sure the hair is laying evenly on the brush. Also, since you started in the back, this will have air dried a little. Wet it a little bit if you think it’s getting too wavy. Once the hair starts drying and developing it’s own wave, you need to wet it a little or you’ll just end up with more frizz. Stop for knots! Comb them out nicely or bad things can happen!
- After you’ve blown your hair out entirely, go back through and handle the fly aways! My favorite technique for that is blowing all the little hairs underneath the big hairs. In other words, using your blow dryer with the nozzle attached, push the little hairs underneath the longer heavy hairs. The longer heavy hairs will sit on top of the little hairs and weigh them down! It’s my favorite trick and works so much better than loading the top of your head with hairspray.
- After you’ve gotten dressed and the hair has cooled, the fly aways should be tamed. Now go back in, take off the nozzle, flip your head over and “stir it up”. This gives you a more natural, piece-y look and keeps it from looking too done.


0 linhas escritas por outros:
Enviar um comentário